Integration Testing in ROS 1
Introduction
Software keeps getting more complex, and without a test harness, maintenance becomes near impossible. Unit testing and TDD have become mainstream, but on their own they aren’t enough to guarantee bug-free software. That’s where integration tests come in.
ROS1 is being phased out, but many teams still run large codebases on it. Adding integration tests to those systems preserves their behavior and makes future changes safer.
This post covers the difference between unit testing and integration testing, why integration testing matters in robotics, and how to write your own using the built-in ROS1 test types.
Unit Testing vs Integration Testing
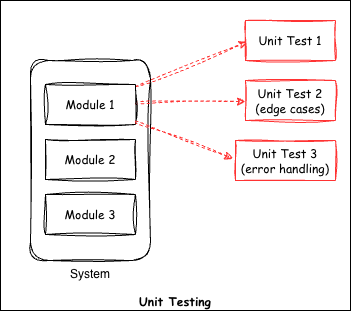
Unit tests verify individual functions in a code base. They test a single method or class. For example, if we have a function that adds two items, a unit test would check the output against a known result. You can have several unit tests for a single method, one for each case, including invalid inputs. In TDD, you write the test first and define the expected behavior, covering edge cases and negative cases.
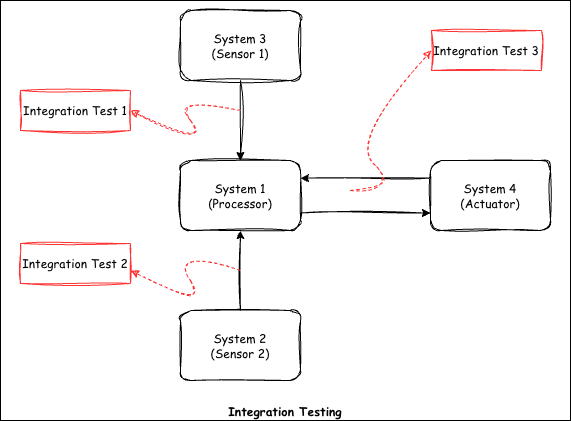
Integration testing on the other hand is meant for checking the communication between several systems in a code base. For example, in robotics, we have a sensor system, a reasoning system and an actuator system. We want to verify that the sensor system is sending data correctly to the reasoning system, and that the reasoning system is commanding the actuator system as expected.
You already do integration testing every time you run all the nodes with roslaunch and manually check whether the system works by looking at the final result in rqt or rviz. The integration test suite provided by ROS1 automates this job for you. Once the tests are written, they make it easy for you to modify other parts of code or add new functionality without having to worry about breaking the old functionality.
In short, unit testing verifies the logic of a single method, while integration testing verifies that different modules work together.
Why Integration Testing Matters in Robotics
In robotics, the worst bugs tend to appear where subsystems meet, and unit tests alone won’t find them. A perception system may pass every test on its own, but the robot can still fail because a message delay sends stale pose estimates to the planner. These problems only show up when the whole system, or a large part of it, runs together. Hardware compounds the issue since sensor noise, actuator lag, and network jitter interact in ways that mocks rarely capture. Running integration tests catches these failures early, before they get expensive on a real machine.
ROS1 Integration Test Types
In ROS1, there are four basic tests for performing integration testing: hztest, publishtest, paramtest and advertisetest.
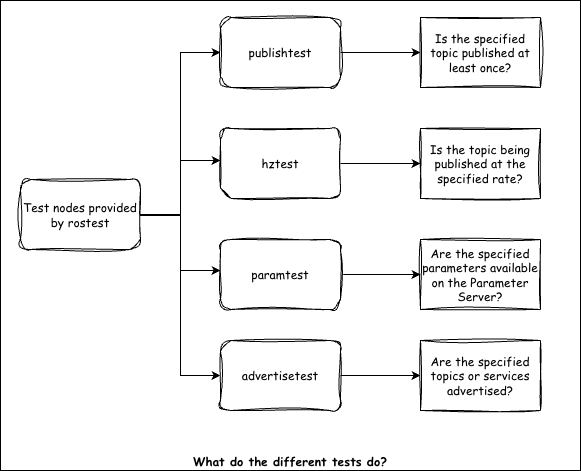
For more details, refer to the following link.
Example: Writing a ROS1 Integration Test
Setup / Node Architecture
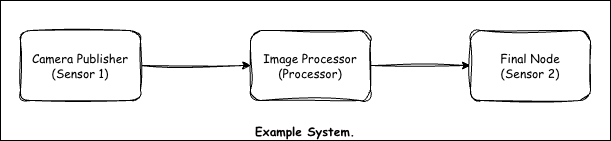
For this example, we have three ROS nodes. One node loads a dummy image and publishes it continuously, simulating a camera. The second node subscribes to this image, processes it and outputs some information. This information is subscribed by the third node.
Launch File
The following launch file starts all three nodes.
Test File (.test)
The test file has a .test extension. It looks similar to a launch file but includes the test nodes alongside the system nodes.
Running & Interpreting Results
First, build the Docker environment by navigating to the docker directory and running:
docker build -t ros1_integration_testing -f Dockerfile .
Inside the container, run catkin_make for the initial build. After the first build, you can source the workspace using the provided setup script.
To run the integration tests, you have two options:
# Option 1: Run all tests via catkin
catkin_make run_tests

# Option 2: Run a specific test file directly
rostest ros1_integration_testing test_image_processing.test
Conclusion
That covers the basics of setting up integration testing in ROS1. Let me know if you have any comments or questions. I’ll put together a ROS2 version of this soon.